You are using an out of date browser. It may not display this or other websites correctly.
You should upgrade or use an alternative browser.
You should upgrade or use an alternative browser.
Suggestion My Holy Grail After 4 years of trading
- Thread starter mohdridzuan
- Start date
-
- Tags
- hope
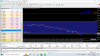
From what i have understand, the Stop Loss should be placed in the final price of the marked zones right?
In this case, the X appeared in the end of the blue zone, so how to set SL in this situation?
Btw a few moments earlier when i placed the buy entry 1.00 that you can see in the chart.. the blue X and the end of the blue marked zone was very close to that entry... as price continued to fall, the blue X kept rapainting down... and even the blue marked zone moved down!
I just noticed, that yes... the zones rapainted!nope. zone are not recalculate
So i thought in cases like this... how about to a Bollinger Bands? When the price re enters one of the Bands zones, then it's safe to say, that a trend reversal is happening, and best moment to enter a position.
Attachments
Last edited:
Aris sugiono
New Member
- Credits
- 0
This is my strategy to enter the market, based on the strategy of mohdridzuan and bp 2000
Where do you place the TP after entry?
This is my review for this thread:
The marked blue and red zones moves away as price moves too, and the arrows repaints or recalculate.. whatever... (at least the arrow don't simply vanish).
Since the thread claims to be "Holy Grail", giving the impression of being the Grandchampion of all forex strategies ever, i felt more confident and made a trade with larger lot size.
The strategy is based on price reversal... well.. that didn't happened on the signal..
The price continued the trend and that treacherous arrow kept repainting...and i got a big Game Over.
Lost 200 usd.
This strategy may work, in some cases, but overall.. it's just not good
Last edited:
sorinchartsarchitects
New Member
- Credits
- 0
Dear mohdridzuan, I may have found the filter you were looking for. Get in touch here with me and we can discuss upon this.
I am getting it tested for the following months to see how stable it is, and once its confirmed, I will begin trading on live account.
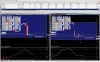
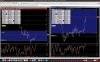
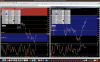
This is current entry from my side, in demo account
Once white arrow appear on both H1 and M15 along to your X sing, its a signal to get ready for the trade.
We should wait for one candle after H1 arrow shows up, to be sure it sticks there. Maybe even enter at the second candle to give it room. I entered quicker, I am following to see if stochastic goes to the bottom area on H1, or it will turn around at the middle level, the 50 level.
If you are still here on this thread, don't hesitate to share your thoughts and get in contact.
All the best to you and your family !
I am getting it tested for the following months to see how stable it is, and once its confirmed, I will begin trading on live account.
This is current entry from my side, in demo account
Once white arrow appear on both H1 and M15 along to your X sing, its a signal to get ready for the trade.
We should wait for one candle after H1 arrow shows up, to be sure it sticks there. Maybe even enter at the second candle to give it room. I entered quicker, I am following to see if stochastic goes to the bottom area on H1, or it will turn around at the middle level, the 50 level.
If you are still here on this thread, don't hesitate to share your thoughts and get in contact.
All the best to you and your family !
Attachments
Nguyen Huy Hoang
New Member
- Credits
- 0
anyone still using this method?
we can create group in telegram and call when signal avaiable
we can create group in telegram and call when signal avaiable
- Credits
- -5
This is my review for this thread:
This deserve 5 stars")
This deserve 5 stars
- Credits
- -5
Thank you for this!For those need EA to close all trades once profit target reached. Please refer below attachment. Thanks
Good Luck All
sorinchartsarchitects
New Member
- Credits
- 0
Dear mohdridzuan, thank you for sharing your setup, to work my way around it and perfect it.
These are the results so far, on demo account. I must say when I first found this method, I moved into it directly in live and until I finished reading all of the information, the trade was unfortunate. That made me go trough all the discussions here and understood that there are strict rules related to margin + that draw down needs improvements. Sharing your results was the key in keeping me interested in going deeper into details on this thread.
So this is what I've done. Built some new things around your setup in order to understand those pullbacks that scared a lot of people here before they even got started to use this setup. As of today, I am trading also a small live account, with 0.01 lotsize and one entry / pair, no more than 3 pairs at the time. Had my first TP hit and the other 2 are in profit towards TP level, they will close soon and look for new opportunities.
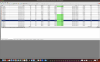
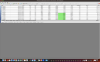
I am sharing below the results in my demo account. The trades that are not colored in green I've closed them manually, because I forgot to setup the TP and even missed around 15% of the extra profit because of that. But was so happy to see that they reached and even crossed the TP level before going back below it.
The other trades are ongoing, waiting for them to finish, monitoring also my 1st entry which was not spot on, it had a little drawdown, around 50$ or so where I've seen some good details that I can now use to perfect the entries and adjust my extra indicators.
For those following the thread, I recommend trying the setup at least in demo account and see how it goes. Out of 3 trades (pairs), one may get sideways for a while, but as mohdridzuan was saying, after that pullback, if its a even a strong one, then the JUMP will be massive towards the TP. I would say that it can even indicate the potential to go more than the initial TP level, but I will gather more data from the next trades on that.
The two pairs that I over traded on my first discovery, after the price went to low to be supported by my margin, they jumped 2x above the TP level. I scratched my head thinking what I have missed for not keeping all the rules aside and apply them accordingly.
Now I am applying the technical and strategy details and seeying very very nice results. I will keep using it in demo for larger lotsizes and in live account for smaller ones, for the following 2 months, to see how the setup behaves and if my addon to the setup can keep me from big drawdowns. Note: I don't have a margin level of 10.000% available, on my 3000 $ account, for the trades taken, so for those of you who try it out, take note on that rule as well and start a live account only if you can follow them 100% in order to get the results shown here.
Good luck to everyone that finds this thread
These are the results so far, on demo account. I must say when I first found this method, I moved into it directly in live and until I finished reading all of the information, the trade was unfortunate. That made me go trough all the discussions here and understood that there are strict rules related to margin + that draw down needs improvements. Sharing your results was the key in keeping me interested in going deeper into details on this thread.
So this is what I've done. Built some new things around your setup in order to understand those pullbacks that scared a lot of people here before they even got started to use this setup. As of today, I am trading also a small live account, with 0.01 lotsize and one entry / pair, no more than 3 pairs at the time. Had my first TP hit and the other 2 are in profit towards TP level, they will close soon and look for new opportunities.
I am sharing below the results in my demo account. The trades that are not colored in green I've closed them manually, because I forgot to setup the TP
and even missed around 15% of the extra profit because of that. But was so happy to see that they reached and even crossed the TP level before going back below it.The other trades are ongoing, waiting for them to finish, monitoring also my 1st entry which was not spot on, it had a little drawdown, around 50$ or so where I've seen some good details that I can now use to perfect the entries and adjust my extra indicators.
For those following the thread, I recommend trying the setup at least in demo account and see how it goes. Out of 3 trades (pairs), one may get sideways for a while, but as mohdridzuan was saying, after that pullback, if its a even a strong one, then the JUMP will be massive towards the TP. I would say that it can even indicate the potential to go more than the initial TP level, but I will gather more data from the next trades on that.
The two pairs that I over traded on my first discovery, after the price went to low to be supported by my margin, they jumped 2x above the TP level. I scratched my head thinking what I have missed for not keeping all the rules aside and apply them accordingly.
Now I am applying the technical and strategy details and seeying very very nice results. I will keep using it in demo for larger lotsizes and in live account for smaller ones, for the following 2 months, to see how the setup behaves and if my addon to the setup can keep me from big drawdowns. Note: I don't have a margin level of 10.000% available, on my 3000 $ account, for the trades taken, so for those of you who try it out, take note on that rule as well and start a live account only if you can follow them 100% in order to get the results shown here.
Good luck to everyone that finds this thread
Attachments

sorinchartsarchitects
New Member
- Credits
- 0
Thanks mohdridzuan to sharing with us your system and your results. The system is good, the strategy is a little risky because it is based on zigzag. In general, when H1 shows the "X", you will have the same "X" also in M15 NECESSARILY. This because any HH or LL in H1 is the same in any other LTF. The unique filter with a zigzag system is to wait! There's no other indicator which can properly filter a zigzag.
In my opinion you can try like this (I take as example a BUY):
1. H1 showing "X" (in the blue zone is much better)
2. M15 necessarily showing "X" too (inside blue zone)
3. Don't buy this first "X", just wait!
4. M15 showing counter trend "X", meaning sell signal. Of course don't get it because H1 is on buy mode
5. M15 showing another "X" buy signal (which is the second one): HERE YOU BUY!
With this strategy you can avoid bigger DD and the "X" signal in H1 will be more reliable.
Instead, if you buy at the first "X" in M15, you are just buying the signal in H1, which is risky and completely wrong
Not really. I have entered a second X on M15 and it pulled back at the first level of H1 painted X and even below it, becoming the new X level.
It's not a sure thing, if you wait. You can loose the chance to win the first push to the TP, which happened in my scenario. Off course, on the long run, that pullback eventually came back to the original TP, but stop loss needs to be way lower then below / above the X sign in order not to get hit during the trades. Sometimes, it only needs 3-5 $ to breathe, before it jumps towards the TP level, clearing first stop losses of a lot of people.
sorinchartsarchitects
New Member
- Credits
- 0
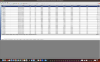
2023 - TRADES
The strategy is still working good. These are the results. Don't get past it, try to master it, test it, see how many trades you can take, try to wait and see worst case scenarios that can happen so that you are prepared to go live with this one. Wait also for market consolidation weeks, rally weeks, etc. to see how it behaves. But try it, it may be a very very good one on the long run, from what I am discovering so far.
The strategy is still working good. These are the results. Don't get past it, try to master it, test it, see how many trades you can take, try to wait and see worst case scenarios that can happen so that you are prepared to go live with this one. Wait also for market consolidation weeks, rally weeks, etc. to see how it behaves. But try it, it may be a very very good one on the long run, from what I am discovering so far.
Attachments
BrianLe1102
New Member
- Credits
- 0
This is my review for this thread:
Very Helpul
Very Helpul
thanks. Im just trying to help.
anyway this is GBPAUD result at the moment. Im gonna hold it. Let see how it will goes tomorrow =)
View attachment 116363[/QUOTE]
What I don't quite understand about the system is when positions are added in the same direction. I don't see in the instructions where that step is indicated.
anyway this is GBPAUD result at the moment. Im gonna hold it. Let see how it will goes tomorrow =)
View attachment 116363[/QUOTE]
What I don't quite understand about the system is when positions are added in the same direction. I don't see in the instructions where that step is indicated.
- Credits
- 23
Dear mohdridzuan, I may have found the filter you were looking for. Get in touch here with me and we can discuss upon this.
I am getting it tested for the following months to see how stable it is, and once its confirmed, I will begin trading on live account.
This is current entry from my side, in demo account
Once white arrow appear on both H1 and M15 along to your X sing, its a signal to get ready for the trade.
We should wait for one candle after H1 arrow shows up, to be sure it sticks there. Maybe even enter at the second candle to give it room. I entered quicker, I am following to see if stochastic goes to the bottom area on H1, or it will turn around at the middle level, the 50 level.
If you are still here on this thread, don't hesitate to share your thoughts and get in contact.
All the best to you and your family !
Glad u profiting from it mate..& Yes..im still using this strategy and this is previous week result.
So far so good. =)
I'm just observing this thread from time to time since what needed already shared..those who are losing because of this strategy..maybe this strategy didnt suits u..OR u guy skipping any rule pointed. Anyway..glad others profiting from it. =)
Attachments
- Credits
- 23
Dear mohdridzuan, I may have found the filter you were looking for. Get in touch here with me and we can discuss upon this.
I am getting it tested for the following months to see how stable it is, and once its confirmed, I will begin trading on live account.
This is current entry from my side, in demo account
Once white arrow appear on both H1 and M15 along to your X sing, its a signal to get ready for the trade.
We should wait for one candle after H1 arrow shows up, to be sure it sticks there. Maybe even enter at the second candle to give it room. I entered quicker, I am following to see if stochastic goes to the bottom area on H1, or it will turn around at the middle level, the 50 level.
If you are still here on this thread, don't hesitate to share your thoughts and get in contact.
All the best to you and your family !
& dont hesistate to personally message me..about that filter..maybe i can improve it or just remain with that filter?..who knows. =)
- Credits
- 64
Sim, esses indicadores foram repintados.
Se o indicador tornar seu MT4 lento, tente este.
Acabei de codificar o Scanner.
Só tenho a agradecer sou do Brasil, estou maravilhado com a educação e cordialidade de todos aqui, grato por ter feito esses ajustes filtrando todos os pares meus parabéns