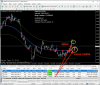
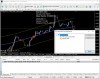
Based on TAM bands passed above or below the band the right input and input.
Closes the order in the middle of the band minimizing the risk of loss.
Put EA in the Experts folder and all indicators in the Indicators folder.
- Just attach EA R4M-BDX-AllPairsEA.ex4 to a chart to trade on all pairs configured in EA, or define the pairs you want to trade.
- If you want to trade in a simple chart use EA R4M-BDX-EA.ex4
- The EA uses the 4M-BDX-ADR.ex4 idic signals, and does not need to attach the Indicator to the pairs to trade
.
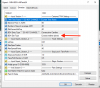
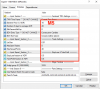
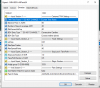
EA very simple and effective, I use the photo settings below
I'm using: H1 (recommended)
AUDNZD, AUDUSD, EURAUD, EURCAD, EURGBP, EURNZD, EURUSD, GBPCAD, GBPNZD, GBPUSD, NZDUSD, USDCAD, USDCHF
(Excluding JPY pairs and some CHF, feel free to use the pairs you want.)

Closes the order in the middle of the band minimizing the risk of loss.
Put EA in the Experts folder and all indicators in the Indicators folder.
- Just attach EA R4M-BDX-AllPairsEA.ex4 to a chart to trade on all pairs configured in EA, or define the pairs you want to trade.
- If you want to trade in a simple chart use EA R4M-BDX-EA.ex4
- The EA uses the 4M-BDX-ADR.ex4 idic signals, and does not need to attach the Indicator to the pairs to trade
.
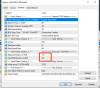
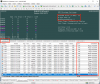
EA very simple and effective, I use the photo settings below
I'm using: H1 (recommended)
AUDNZD, AUDUSD, EURAUD, EURCAD, EURGBP, EURNZD, EURUSD, GBPCAD, GBPNZD, GBPUSD, NZDUSD, USDCAD, USDCHF
(Excluding JPY pairs and some CHF, feel free to use the pairs you want.)
Attachments
Last edited: